Step by step process for beginners, new to GitHub. It’s easy to create an account and get started today.
Use a Team/Pro Account
Even as a total newbie to GitHub, I recommend this low-cost option so you can use a custom domain name and publish from a private repo in a separate Team account instead of publishing from a public repo on your personal account.
Editing and Publishing
It is important that you understand the process. This repository has two branches. All editing is performed on files in the top level edit branch. When you’re done and ready to publish, you will then pull your updates into the publish branch for the automatic Pages Build and Deploy action. This may not be SOP for GitHub pages but it works for me.
Make it Your Own
All you need to do is edit a few files for starters. And if you’re like me and never really done this kind of thing before, open those files in the editor to see just how easy it is to use GitHub “markdown” formatting for your content.
For me, the best way to learn has been by example, so you may want to keep this page and the design page as references. You can do that without including them in your site. You will notice that much of the fancy stuff I do is with HTML.
See Writing on GitHub for more on markdown syntax. All of GitHub is well documented in their help pages.
Step 1: Create the Repository
- Click here to open TR-Systems/lakeside on GitHub in a new browser tab.
- Click the button in the upper right to Use this template and select create new repository.
- Create a New Repository appears. Owner will default to your GitHub userid. Switch to your Team account if using one. Give your repo a short web-friendly name like “web” or “mycoolthing” since the repo name is the top level path in the url to your site. DO NOT include all branches. If using a personal account, you must create a public repo, and only one of your public repos can have a website. This restriction does not apply for Team accounts.
- Click Create repository
- The repo will be copied and created. You are looking at it now.
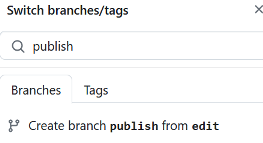
- Create the publish branch by clicking on the edit branch button, then type “publish” and then click the line that says create branch publish from edit, as shown here by clicking this button:
The publish branch is now ready to receive updates from the edit branch. You are looking at it now.
Click that button again and SWITCH BACK TO THE EDIT BRANCH.
Step 2: Edit config.yml
Fill in your header and footer information and define the links you want to provide for the three buttons in the upper right corner of the page. Follow the instructions and tips provided in the file.
Commit your changes.
Now is a good time to skip down to Step 7 to initiate a pull request into the publish branch and then Step 8 to configure your repository and build your new website so you can see the changes you just made and confirm the process works for you.
Then come back to finish the job of making it your own.
Step 3: Edit index.md
This is your home page. Remove the front matter if you do not want a toc or print button. Note: If you do not specify a page title in the front matter, Jekyll will use the first markdown heading in the page as the title shown in the browser tab.
Step 4: Edit about.md
Tell the world what this is all about.
Step 5: Edit _includes/site-menu.html
Give users an easy way to navigate your site. If not specified in the config file by the menu variable, the button will not be displayed. Remove the links for the Design and Get Started pages if you have excluded them from your site in the config file.
Step 6: Edit _includes/toc-homepage.html
Either update or delete this file if you will not using it. See TOC Made Easy below for more on how to use this feature.
Step 7: Pull Request to Publish
This process will create a pull request to apply your changes to the files in the publish branch.
- Click on
 Pull Requests in the nav bar, then New pull request
 - Comparing Changes appears.
Set the branch comparison as shown here:

- GitHub will compare files and display the changes generated by your commits to the edit branch. Scroll down to view.
- Click Create pull request
- Open a Pull Request appears, where you can enter a title (required), optional description and view the changes again.
Click Create pull request again - GitHub checks to see if there are any conflicts between the two branches. There won’t be as long as you never edit and commit any changes directly to the publish branch.
Click Merge pull request - Click Confirm Merge
- After you have executed the next step, each time you merge changes into the publish branch, GitHub will run the Pages Build and Deploy action automatically.
Step 8: Configure GitHub Pages
You only need to do this once.
- Click the repo settingsSettings button.
- In the nav bar on the left, click Pages
- GitHub Pages Build and Deployment appears.
Select Deploy from branch, publish /root
Click Save. - GitHub will kick off the Pages Build and Deploy action
- Click play_circle_outlineActions to watch that process run
- Go back to Settings/Pages and click the link to visit your site
Voila! Websites made easy. Ha! Your job has just begun.
But that’s it, in a nutshell, apply changes to the edit branch and pull them into publish.
Technical Reference
_layouts/default.html
Defines the HTML structure of your pages and is where the values of the config variables are placed on the page.
assets/css/style.scss
Defines how all content appears on your pages and is referenced in the <head> section of default.html.
images
Cut and crop your image files way down in size and resolution before uploading to this folder and using them in your pages. You can fine-tune the size of an image on a page using width, height or percent settings when you reference it. There is much more to this topic than I can possibly share with you here. Just don’t upload full resolution pics from your camera.
_includes
This is where you will define your site menu for all pages and a table of contents for any page that warrants, which are referenced in default.html. The site menu is called out in the config file using the menu variable. A toc is called out in the front matter of the page using the toc variable.
print-button.html
If you want the print button to appear in the header, call it out in the front matter of your page using the print variable.
button-script.html
This is the script that displays and hides the dropdown content for the site menu button, toc button and all other buttons you define with class=”dropdown”. The script will only hide the toc content when you click elsewhere on the page. All other dropdown buttons must be clicked again to hide their content, or by including the Collapse All button in the toc html file for the page, as shown on the Design page.
This script is included at the bottom of the page in default.html and must remain there.
_site
This is where your website is built and served from. In here, you will see your markdown pages converted to html.
Google Analytics
Setting up Google Analytics is easy. All you need to do is create an account and then define a “stream” for it to monitor, that being the url for your website. That will provide you with the “code snippet” that you need to put into an html file in the _includes folder and then call it out using the google-analytics variable in the config file.
So until then, please be sure to comment-out that variable in your config file. Thank you!
Develop on Windows
Last updated: 2024-02-22
- Install Git Bash and GitHub Desktop for Windows (all good)
Git has many install options. Take the defaults but do not include Scalar support for Large Repositories. - Install Ruby (all good).
Take the defaults and be sure to run the ridk process at the end. I installed Ruby at c:\Ruby32. This app is huge. - Open Command Prompt or Git Bash and confirm:
ruby -v returns Ruby 3.2.3 (2024-01-18 revision 52bb2ac0a6) x64-mingw-ucrt<br> gem -v returns 3.4.19 bundle -v returns Bundler version 2.5.6 jekyll -v returns jekyll 4.3.3 - Clone the edit branch of your repo using GitHub Desktop
- Create or update .gitignore file in the root folder to include all of the Jekyll stuff
_site _posts Gemfile Gemfile.lock 404.html .sass-cache .jekyll-cache .jekyll-metadata vendor - Add Gemfile to the root folder
source "https://rubygems.org" gem "github-pages", group: :jekyll_plugins gem "webrick" gem "wdm" - Open Git Bash and cd to your repo root folder (edit branch)
- Run bundle install. Only need to do this once.
Ok, 98 gems installed, a brick of web I guess. - Run bundle exec jekyll serve
The site now builds and is served locally from the _site folder, where you will see your markdown files converted to html. Check it out!
- You can now add or update files in the local clone of the repository on the fly with the jekyll server running and see them instantly in your browser with a page refresh.
- When you’re done, review your changes using GitHub Desktop and then push them up to the edit branch on GitHub.
- Then, on GitHub, create the pull request into the publish branch for “pages build and deploy”.
Editing on Windows
I’m using Notepad++. I like the folder workspace on the left, and how it highlights content when editing. It also has tabs for editing multiple files. My only tip is to set a block cursor and have tabs converted to spaces. You will have to dig through the settings to find those.
Develop on Ras Pi
2-20-24: Ok, here we go, starting with a fresh Ras pi 4 B.
- Install Ruby and Jekyll per the doc referenced above and confirm:
ruby -v returns 3.1.2p20
jekyll -v returns 4.3.3 - Cd to local github folder and run git clone ‘url to your website repo’
- Create or update .gitignore file in the root folder, same as shown for Windows
- Add Gemfile to the root folder, without “wdm”
source "https://rubygems.org" gem "github-pages", group: :jekyll_plugins gem "webrick" - Cd to the root folder of your repository and run git fetch to get some changes between step 2 and now
- sudo su
- Run bundle add webrick
Adds a LOT of Jekyll gems, themes and other web stuff, a brick of web I guess. - exit out of su
- Run bundle install
Ok, 97 gems now installed (one less than Windows, no wdm) - Run bundle exec jekyll serve
- Yay! It works!
FINALLY, for the first time in this never ending all time consuming silly winter project of mine, something actually worked on the first attempt! Without a single rat hole to chase down first.
Fun stuff… hope it is for you, too!
End of Document